Easy Dry Brined Turkey Breast for Thanksgiving
Make Thanksgiving easy with this turkey dinner for a small family. Crispy skin, tender meat, roasted veggies, and gravy—just right for 2–4.
or read on for step-by-step instructions with photos

Thanksgiving Turkey Dinner for a Small Family
Want all the comfort of Thanksgiving without cooking a whole bird? This dry-brined turkey breast is made for smaller gatherings, giving you crispy skin, juicy meat, and rich homemade gravy—without the hassle of a full bird.
Everything roasts in one pan for easy cleanup. The turkey cooks on a colorful bed of root vegetables, soaking up all that flavor from the drippings. Plus, dry brining locks in moisture and enhances the seasoning, making every bite of your turkey tender and delicious.
Why You’ll Love This Small Family Turkey Dinner
Perfect for smaller gatherings: Feeds 2–4 people comfortably, with lots of leftovers for sandwiches or soup.
One-pan ease: The turkey and vegetables roast together for maximum flavor and minimal effort.
Low-stress timing: Let the turkey rest while you make gravy and set the table—no frantic last-minute juggling.
What’s Ahead in This Thanksgiving Turkey Breast Recipe
Pro Tips: How to get crispy skin, juicy meat, and perfectly cooked turkey breast every time.
Substitutions: Easy swaps for root veggies, turkey cuts, or the seasoning blend.
Storage Tips: How to store leftovers, reheat turkey breast without drying it out, and ways to repurpose leftovers.
Serving Ideas: What to serve with turkey to round out your Thanksgiving feast.
FAQs: Answers to your most common questions about dry brining, keeping turkey breast moist, and more.
But first, I’ll walk you through this dry-brined turkey breast recipe step-by-step with photos, so you get perfectly juicy meat and crispy skin on your first try.
Let’s get dry-brining!

What You’ll Need for This Thanksgiving Turkey Breast Dinner
Turkey Dinner Ingredients
For the Dry Brine
2 tablespoons coarse sea salt
2 teaspoons brown sugar
2 teaspoons smoked paprika
1 sprig rosemary, chopped
4 sprigs thyme, chopped
2 cloves garlic, finely minced
1 lemon, zested
For the Roast and Homemade Gravy
2 bone-in, skin-on turkey breasts (4 pounds total)
10 heirloom baby carrots, halved
4 potatoes, cut into wedges
3 large parsnips, peeled and chopped
6 sprigs thyme, finely chopped
1 tablespoon smoked paprika
1 cup white wine
2 cups chicken stock
2 tablespoons butter
2 tablespoons flour
olive oil
salt & pepper
Equipment for Dry Brining and Roasting Turkey
Small bowl & tray (for dry brining turkey breast)
Knife and cutting board
Large roasting pan
475°F oven
Medium saucepan, whisk, and spatula (for gravy)
Makes: 4 servings (with leftovers)
Prep: 15 min + 24 hours dry-brine time
Cook: 50 min + 30 min resting time
How to Cook Turkey Breast for Thanksgiving
Step-by-Step with Photos
Step 1: Dry-brine the turkey breasts
Mix all the dry brine ingredients in a small bowl.
Lay the turkey breasts on a tray and pat them dry with a paper towel.
Sprinkle the dry brine evenly over both sides, then press and rub it in to fully coat the meat.
Place the tray uncovered in the fridge and let the turkey rest for 24 hours. Leaving it uncovered allows the skin to dry out slightly, which helps it brown and crisp up better in the oven.


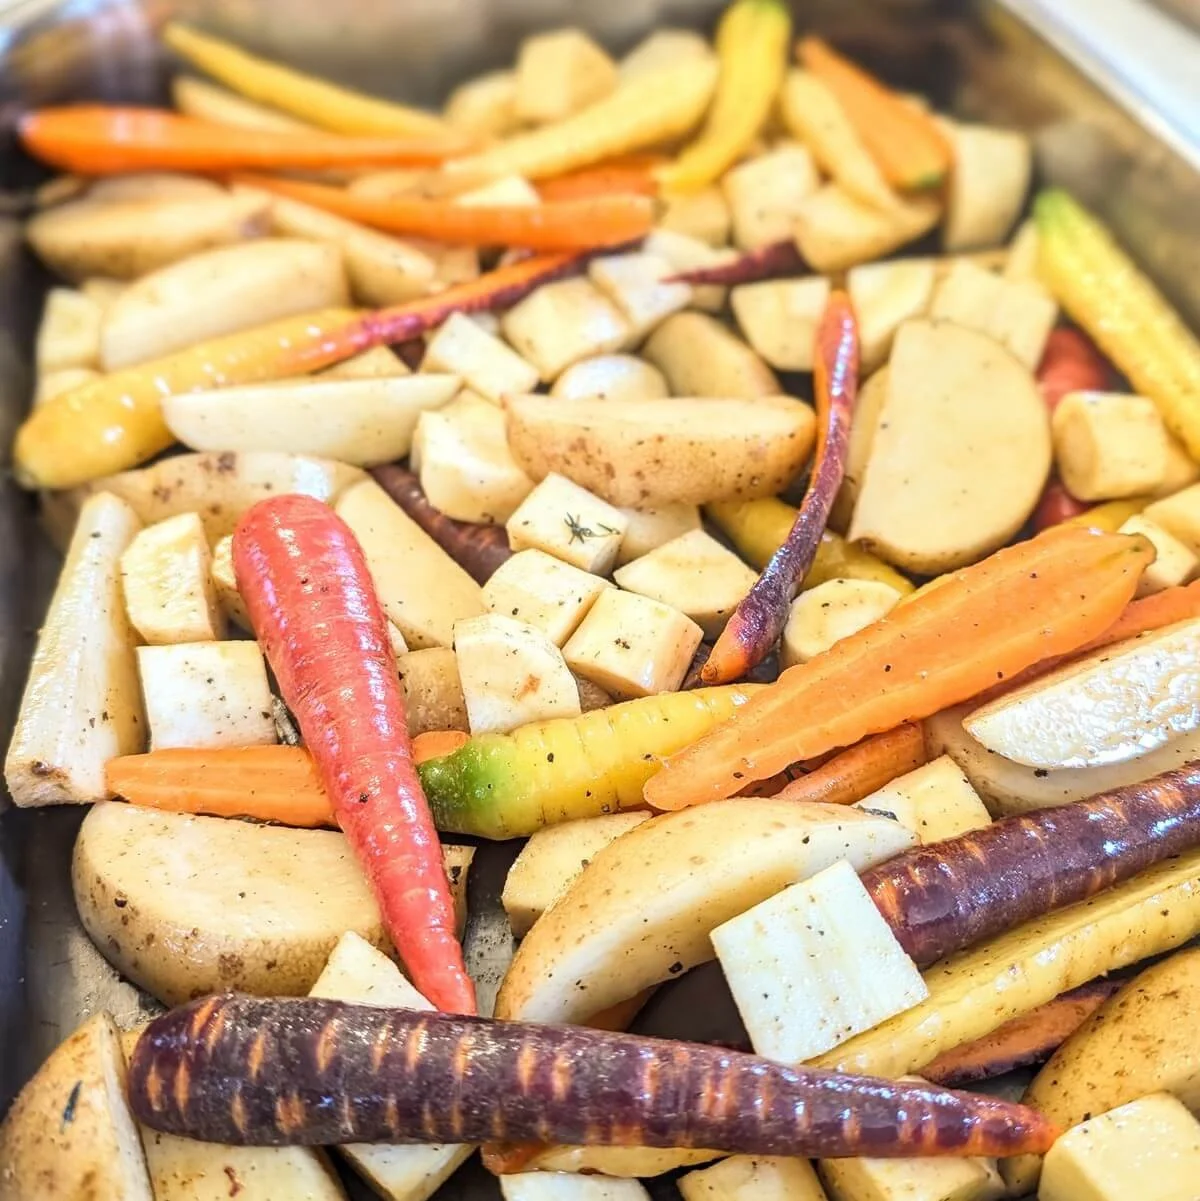
Step 2: Roast the turkey and root vegetables
Preheat your oven to 475°F.
While it heats, prep the root vegetables and spread them in a large roasting pan. Drizzle with olive oil, then season with salt, pepper, smoked paprika, and chopped thyme.
Place the dry-brined turkey breasts on top of the vegetables, skin side up. Rub the skin with olive oil to help it brown and crisp in the oven.
Transfer the roasting pan to the oven and set a timer for 20 minutes.


Step 3: Add wine and stock, then finish roasting
After 20 minutes of roasting, carefully pour the white wine and chicken stock into the pan to deglaze.
Return the pan to the oven and continue roasting for about 30 more minutes. Keep a close eye on the internal temperature of the turkey breasts—timing may vary based on size.
When the thickest part of the breast (not touching bone) reaches 155°F, transfer the turkey to a tray and let it rest, uncovered, for at least 30 minutes.
Check the vegetables for doneness—they should be golden and tender. Roast a few extra minutes if needed, then remove from the oven.


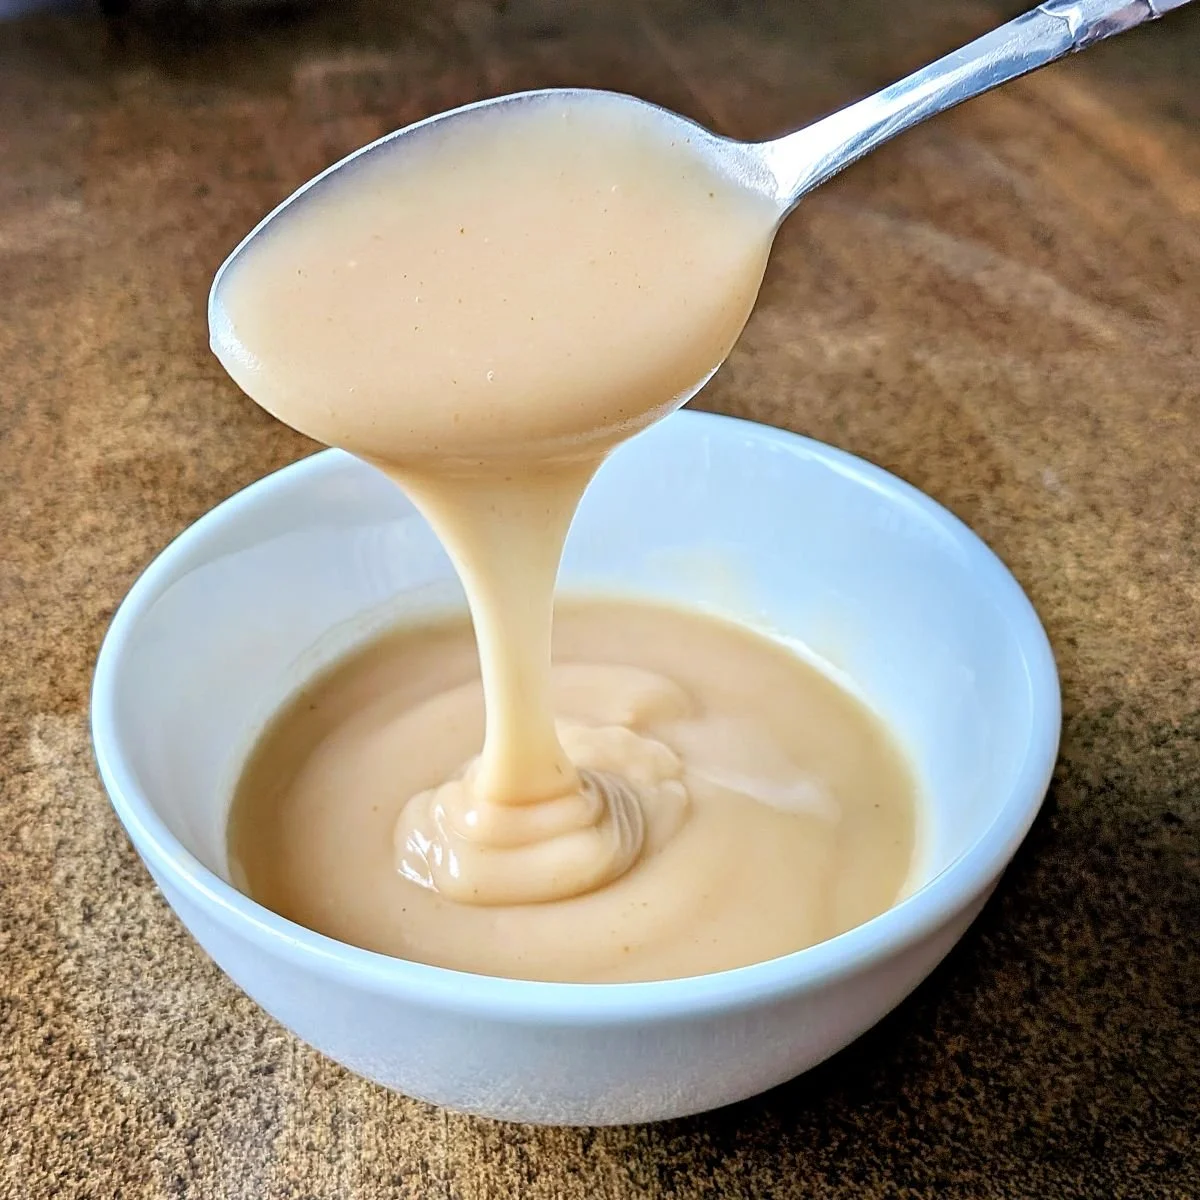
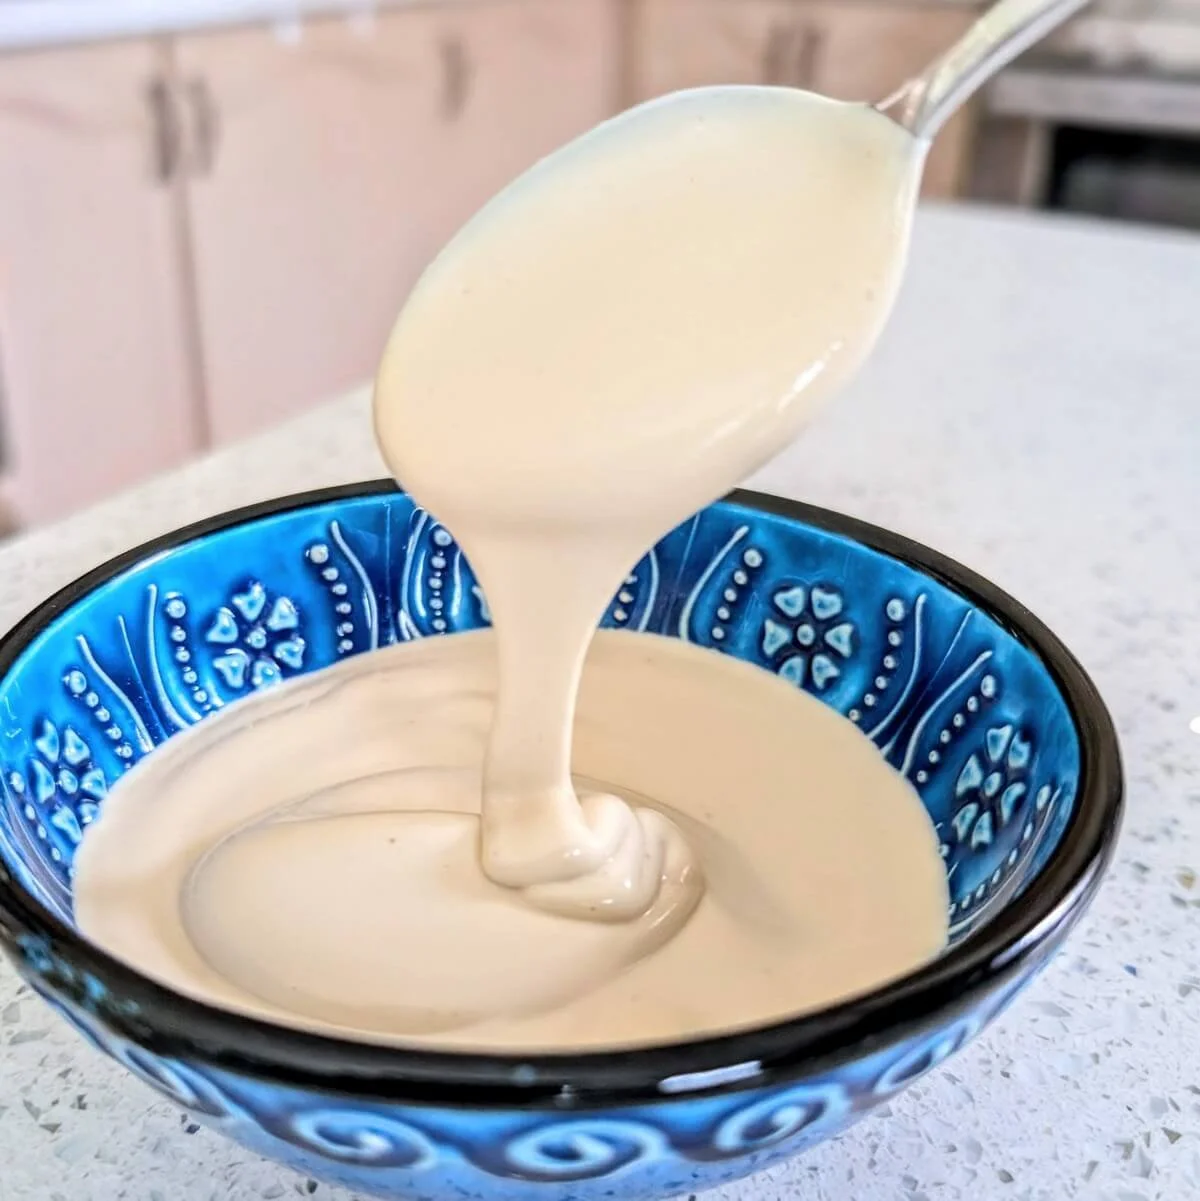
Step 4: Make the gravy from the pan drippings
While the turkey rests, it’s time to make the gravy. Strain the pan drippings into a container, leaving the vegetables in the pan so they’re ready for reheating later.
In a medium saucepan, melt the butter over medium-high heat. Stir in the flour to form a roux, then stir constantly with a spatula until it turns golden brown and smells nutty—about 5 minutes.
Ladle in the pan drippings gradually, whisking well after each addition. The mixture should begin to thicken as the liquid is absorbed.
Scrape the bottom and sides of the pan as you go to prevent sticking.
Once all the liquid is added, bring the gravy to a boil, then reduce to a simmer and let it thicken for a couple more minutes.
The finished gravy should be smooth and velvety. If there are any lumps, strain it through a fine-mesh sieve, then season to taste with salt and pepper.
Cover and keep warm until serving.


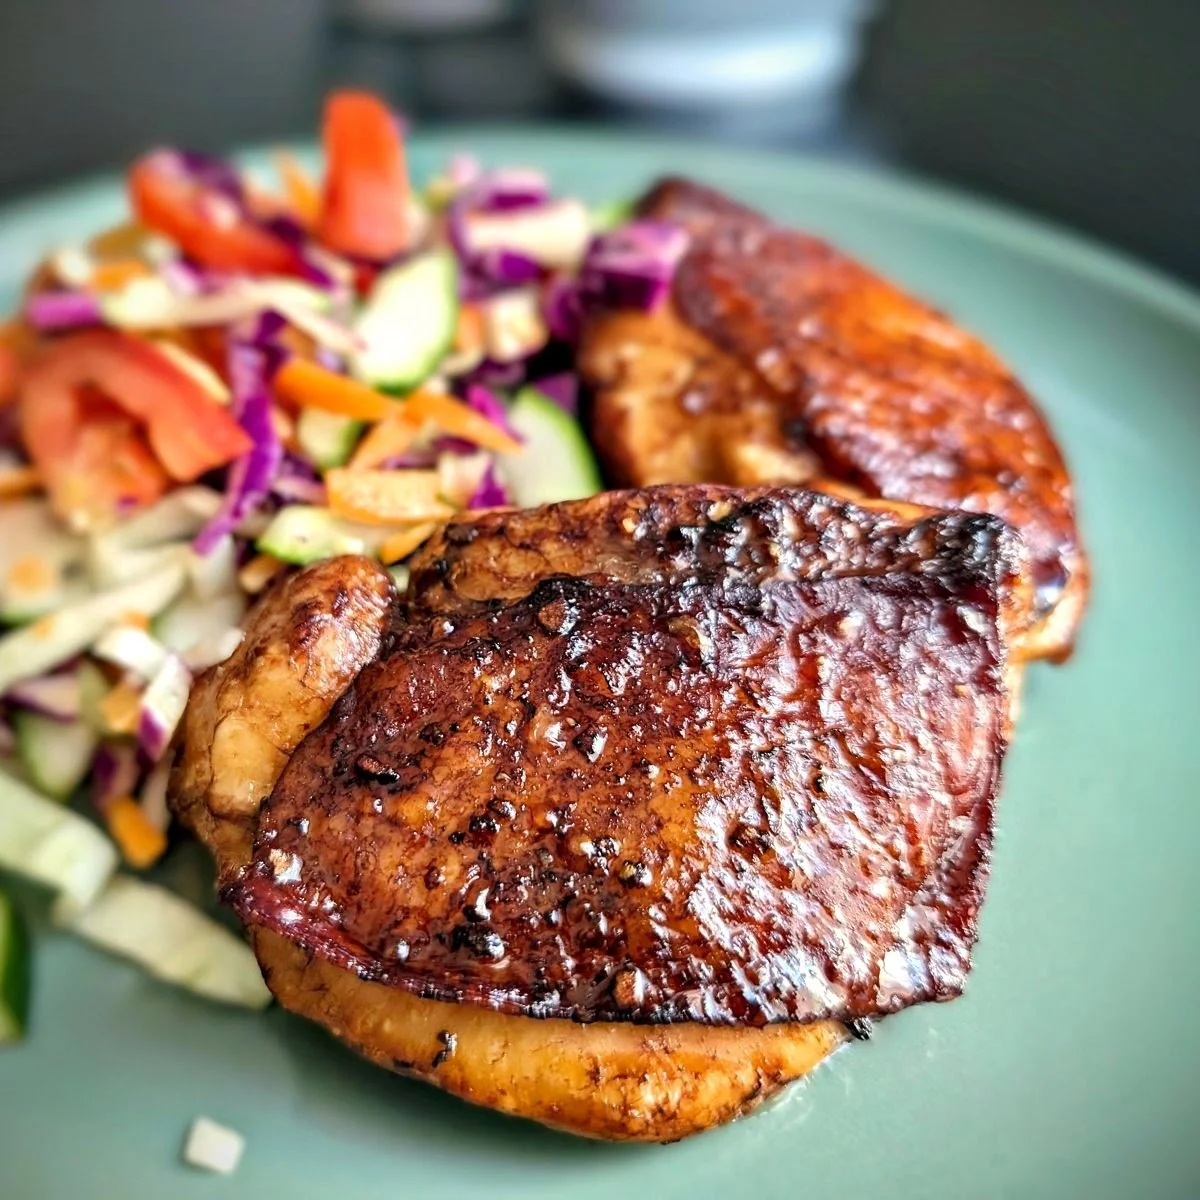
Step 5: Slice the roast turkey breast
Once the turkey has rested for at least 30 minutes, it’s ready to slice.
Start by removing the breast meat from the bone. Use the tip of a sharp knife to make horizontal cuts along the bone, peeling back the meat with your other hand.
Keep working the knife along the breastbone until the meat separates completely.
Next, slice the turkey breast crosswise into even pieces.
Trim off any extra meat from the breastbone to use in sandwiches or salads, and save the bones in the freezer for homemade stock.


Step 6: Reheat and serve your small Thanksgiving dinner
Preheat your oven to 400°F.
Arrange the sliced turkey breast on a tray, drizzle with a spoonful of gravy and a splash of water to help retain moisture, then cover with foil.
Place the tray of turkey and the roasting pan of vegetables into the oven and reheat for 5–10 minutes, just until everything is warmed through. They should still be slightly warm from resting.
Meanwhile, reheat the gravy on the stovetop until hot.
Once everything is ready, transfer the turkey slices to a serving platter and fan them out for a clean, restaurant-style presentation.
Serve with the roasted root vegetables and warm gravy on the side.
Looking for an easy green side? Try my marinated green beans (pictured below)—they’re make-ahead friendly and delicious warm, cold, or at room temperature.

My Tips for the Best Roast Turkey Breast
Use a meat thermometer: A thermometer takes out all the guesswork. Insert it into the thickest part of the breast (not touching bone) and pull the turkey at 155°F. It will rise to a safe and juicy 165°F as it rests.
Roast at high heat: Cooking at 475°F gives you crispy skin and juicy meat in less time. It’s the best way to brown the turkey fast without drying it out.
Skip the basting: Thanks to the dry brine, there’s no need to baste. It locks in moisture naturally—and opening the oven frequently can actually disrupt cooking by letting out hot air each time.
Turkey Dinner Ingredient Swaps and Variations
Turkey breast: Bone-in, skin-on turkey breasts help retain moisture and add flavor to the pan drippings. You can use a boneless breast for easier slicing—it just cooks faster, so monitor the internal temperature closely.
Bone-in turkey thighs are another great option for dark meat lovers. Since they have more connective tissue, cook them a bit longer—pull at 165°F to reach a final temp of 175°F. The extra time helps them get tender, and their higher fat content helps keep them juicy.
Veggies: Use any firm, roast-friendly vegetables you like—turnips, sweet potatoes, onions, or squash all work well. Avoid delicate vegetables like Brussels sprouts or green beans, as they overcook easily and are better prepared separately.
Seasonings: Customize the dry brine or vegetable seasoning with your favorite spices like dried oregano, nutmeg, or allspice. You can also switch up the herbs—sage, parsley, marjoram, or savory all add a unique flavor profile.
Wine: No white wine on hand? Try apple cider, a splash of white wine vinegar mixed with water, or simply use extra stock. The goal is to bring in a touch of acidity to balance the richness of the gravy.
How to Store and Reheat Leftover Turkey Breast
Fridge: Store leftover turkey, roasted vegetables, and gravy in separate airtight containers in the fridge for up to 4 days. Let everything cool completely before sealing and refrigerating.
To reheat:
Gravy: Reheat gently on the stove or in the microwave, whisking to return it to a smooth consistency. Add a splash of stock or water if it thickens too much.
Turkey & Veggies: Place sliced turkey and veggies on a tray. Drizzle with a bit of gravy and a splash of water, cover with foil, and warm in a 350°F oven for about 10–15 minutes. This keeps the turkey breast from drying out and ensures everything stays flavorful.
Prefer to use a microwave? Place a few slices of turkey and veggies in a microwave-safe dish, drizzle with gravy and a splash of water, cover loosely, and heat in 30-second bursts until warmed through.
Freezer: Both the turkey and root vegetables can be frozen, though their texture may soften slightly upon thawing. Dice them and pack into freezer-safe containers or zip-top bags for up to 3 months. Gravy also freezes well—just leave a little space in the container for expansion.
Thaw & repurpose: Thaw leftovers in the fridge overnight. Try turning them into a hearty stew by combining diced turkey, veggies, a bit of gravy, and turkey stock (bonus points if it’s made from the reserved bones🫡). Add cooked wild rice for extra texture and flavor.
What to Serve with Turkey
Beyond the roasted root vegetables and gravy, a few simple sides can help round out your small Thanksgiving dinner.
Vegetable sides: Add color and contrast with bacon fat Brussels sprouts, baked butternut squash, marinated green beans, or roasted Mediterranean vegetables.
Starchy extras: Serve it with cheesy garlic bread, cauliflower mash, or creamy polenta for something hearty.
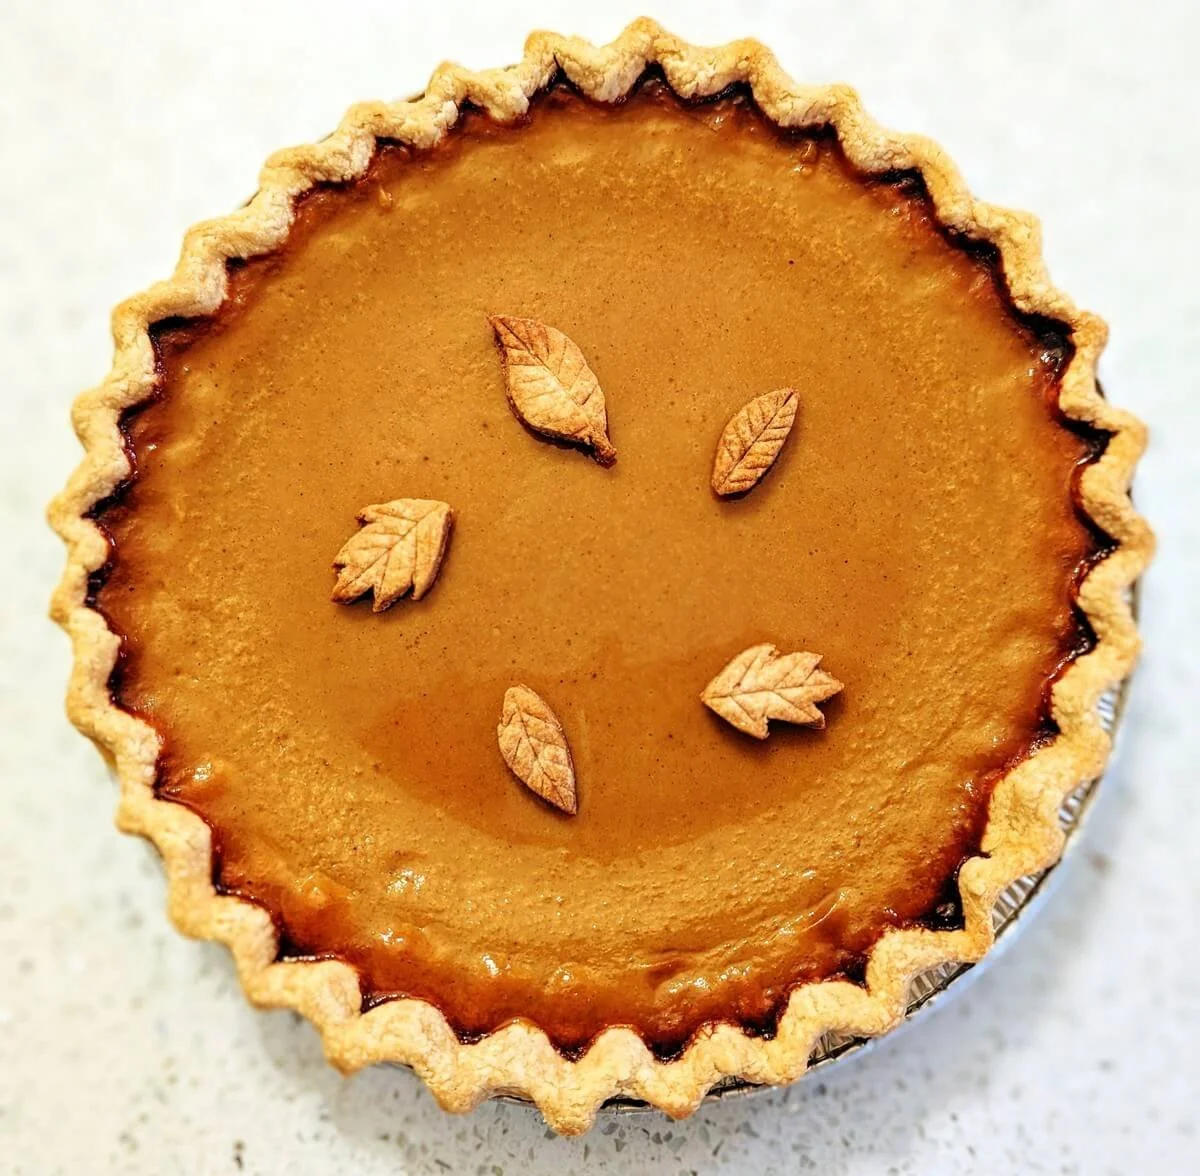
Don’t forget dessert: End your meal on a cozy note with homemade pumpkin pie—the ultimate Thanksgiving dessert.

Dry Brined Turkey Breast FAQs
What is a dry brine?
A dry brine is a method of seasoning meat by rubbing it with salt and other spices and then letting it rest in the fridge for a few hours up to a couple of days.
Unlike a wet brine—where you soak the meat in a saltwater solution—a dry brine uses the salt and seasonings directly on the meat’s surface. The process boosts flavor, helps tenderize, and keeps the turkey breast juicy by reducing contraction during cooking.
How long should I dry-brine a turkey breast?
How long you should dry‑brine a turkey breast really depends on the size of the breast. For a typical 2‑pound bone‑in turkey breast, 12 to 24 hours is perfect.
If your turkey breast is large, you can go up to 48 hours. The longer rest time lets the salt work deeper into the meat, improving flavor and moisture retention.
Can I dry-brine a frozen turkey breast?
Yes, you can start dry brining a turkey breast even if it’s still frozen. As it finishes thawing in the fridge, the salt will begin to work its way in, especially if you allow for a longer brine time (up to 48 hours).
Should I rinse turkey after dry brining?
No, do not rinse a turkey after dry brining. Rinsing will wash away the flavorful brine that you’ve created. Instead, pat the turkey dry with paper towels and rub it with some oil or butter before roasting, which helps the skin crisp up beautifully.
How do you keep a roasted turkey breast moist?
Keeping a roasted turkey breast moist comes down to a few key steps:
Dry brine: First, dry brine ahead of time to lock in juices.
Roast at high temp: Then roast at a high temperature (about 475 °F) so the turkey browns quickly without drying out.
Remove early: Pull the turkey from the oven when it reaches around 155 °F internal temperature—remember it will reach the safe 165 °F while it rests.
Let it rest: Finally, let the turkey rest for at least 30 minutes before slicing so the juices redistribute and stay in the meat.
How to reheat turkey breast without drying it out?
To reheat turkey breast without drying it out, place the sliced turkey on a tray, drizzle it with a bit of gravy and a splash of water, then cover the tray with foil and warm it in a 350 °F oven for about 10‑15 minutes until it’s heated through. This gentle method keeps the turkey juicy.

That’s it—enjoy your Thanksgiving turkey dinner!
Dry-brining is one of my favorite ways to build flavor and keep turkey juicy. Back in my restaurant days, we used this technique regularly to infuse meat with flavor while keeping it tender and moist.
Whether you’re hosting a small Thanksgiving or cooking for two, this method is tried and true, helping you get beautifully seasoned, perfectly cooked results every time.
Pin This Dry Brined Turkey Breast Recipe for Later!

Easy Thanksgiving Turkey Breast Recipe
This easy dry-brined turkey breast with veggies and gravy packs big flavor without the full bird. A cozy Thanksgiving dinner for 2 to 4.
Makes: 4 servings (with leftovers)
Prep: 15 min + 24 hours dry-brine time
Cook: 50 min + 30 min resting time
Dietary Notes: Egg-free, Low-carb, High-protein
Turkey Dinner Ingredients
For the Dry Brine
2 tablespoons coarse sea salt
2 teaspoons brown sugar
2 teaspoons smoked paprika
1 sprig rosemary, chopped
4 sprigs thyme, chopped
2 cloves garlic, finely minced
1 lemon, zested
For the Roast and Homemade Gravy
2 bone-in, skin-on turkey breasts (4 pounds total)
10 heirloom baby carrots, halved
4 potatoes, cut into wedges
3 large parsnips, peeled and chopped
6 sprigs thyme, finely chopped
1 tablespoon smoked paprika
1 cup white wine
2 cups chicken stock
2 tablespoons butter
2 tablespoons flour
olive oil
salt & pepper
How to Cook Turkey Breast for Thanksgiving
Dry-brine the turkey breasts. Mix dry brine ingredients in a small bowl. Pat turkey breasts dry with a paper towel, then rub the dry brine all over. Place uncovered on a tray in the fridge for 24 hours—this helps the skin brown and crisp up better in the oven.
Roast the turkey and vegetables. Preheat oven to 475°F. Spread chopped root vegetables in a large roasting pan. Drizzle with olive oil and season with salt, pepper, smoked paprika, and chopped thyme. Place the turkey breasts skin-side up on top of the vegetables and rub the skin with olive oil. Roast for 20 minutes.
Add wine and stock. Carefully pour the white wine and chicken stock into the pan to deglaze. Return to the oven and roast for another 30 minutes, or until the thickest part of the breast reaches 155°F (not touching bone). Transfer the turkey to a tray to rest, uncovered, for 30 minutes. Roast the vegetables a bit longer if needed until golden and tender, then remove from oven.
Make the turkey gravy. Strain the pan drippings into a container. In a saucepan, melt the butter over medium-high heat. Stir in the flour to form a roux and cook, stirring constantly with a spatula, until golden and nutty—about 5 minutes. Gradually ladle in the pan drippings, whisking well after each addition and letting it thicken before adding more. Once all the liquid is in, bring the gravy to a boil, then reduce to a simmer for a couple of minutes. Strain through a fine mesh sieve if there are any lumps, then season to taste with salt and pepper. Cover and keep warm.
Slice the roast turkey. Remove the meat from the bone by making horizontal cuts along the bone with the tip of a knife, peeling it away with your other hand. Once separated, slice the turkey breast crosswise into even pieces. Save the bones for stock and any meat scraps for sandwiches or salads.
Reheat and serve. Preheat the oven to 400°F. Arrange the sliced turkey on a tray, drizzle with a little gravy and water, and cover with foil. Reheat the turkey and vegetables until warmed through, about 5–10 minutes. Warm the gravy on the stovetop. Transfer the turkey to a platter, fan out the slices, and serve with the veggies and hot gravy on the side.
Top Tips for the Best Roast Turkey Breast
Use a meat thermometer: Always check doneness with a thermometer. Insert it into the thickest part of the breast (not touching bone) and pull the turkey out at 155°F—it will rise to a safe 165°F as it rests.
Skip the basting: The dry brine locks in moisture, so no need to baste. Plus, opening the oven repeatedly lets out heat and can disrupt cooking.
Serving suggestion: Add a vibrant green side like my marinated green beans (make-ahead friendly!) and finish the meal with a classic homemade pumpkin pie for the ultimate Thanksgiving feast.
For more, check out my tips, substitutions, how to store, serving ideas, and FAQs!
Did you try this Thanksgiving turkey breast recipe?
I’d love to hear how it went—or how you made it your own. Please leave a comment below or tag me on Instagram @onecreativecook if you share your creation!
More Thanksgiving Dinner Ideas
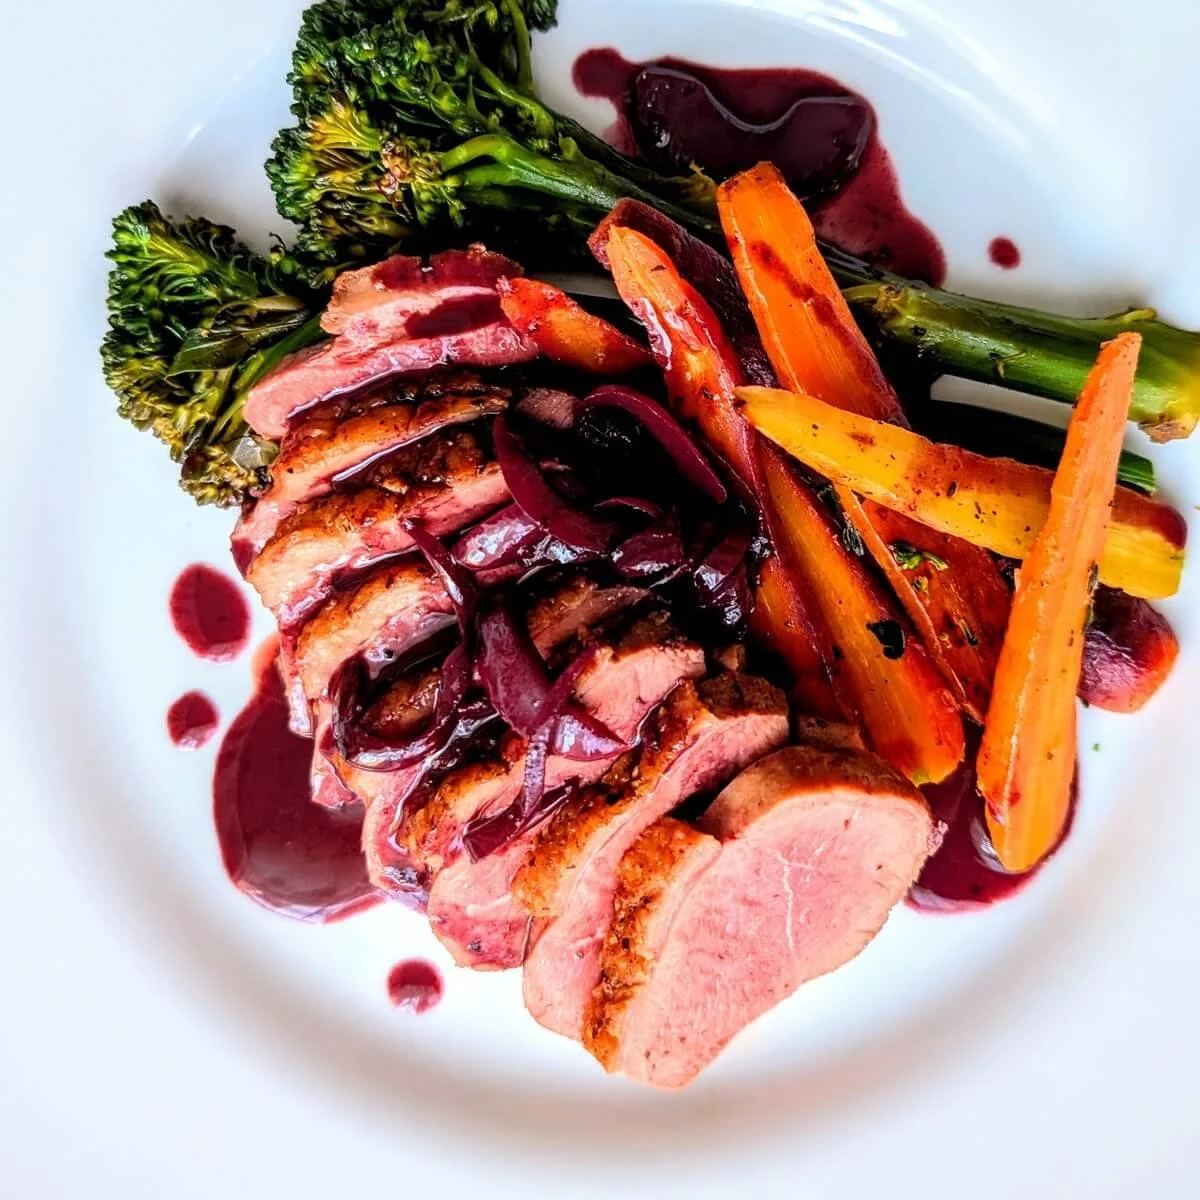
Duck breast with easy pan sauce: A restaurant‑worthy alternative to turkey for intimate gatherings or holiday dinners.
Festive roasted butternut squash: Warm and autumnal with nutmeg and sumac—an ideal side for your Thanksgiving spread.
Overnight marinated green beans: These zesty green beans can be made ahead and enjoyed at room temperature for stress‑free serving—perfect for busy holiday kitchens.
Homemade pumpkin purée for pie: Make your pies from scratch this year with fresh, smooth pumpkin purée—no cans needed.
Dark chocolate chunk cookies with sea salt: End your Thanksgiving feast on a sweet note with these chewy, gooey, bakery-style cookies.